
This post is the continuation of Part-1 of 2 part series. In Part-1, we have configured Raspberry Pi at home and made it a Gateway for ZeroTier virtual network. In this post, we will look at configuring a small travel router by GL-iNet to route traffic from all its connected clients via the ZeroTier Home Gateway.
What do you need?
- GL.iNET or any OpenWrt router
Configure OpenWrt router
We are going to configure GL.iNet mini router (OpenWrt firmware 19.07.x) to route all the internet traffic from all lan/wifi clients connected to it via the Home network through the Raspberry Pi ZeroTier Gateway.
Note: As I am using the GL.iNet mini router, some of the screenshots may vary with your router.
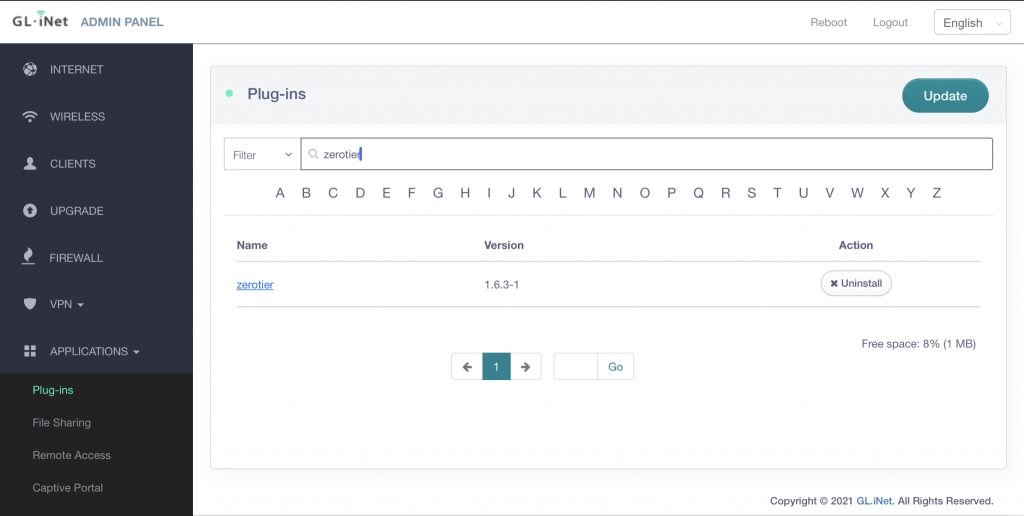
Go to your Router Admin console, Applications -> Plug-ins. Click on ‘Update‘, this will get all the list of available plugins.
Filter ‘All’ and search for ‘zerotier’, click on ‘Install’.
SSH to your travel router and configure ZeroTier client
Edit the /etc/config/zerotier file, modify below 2 lines
 option enabled '1'
 list join '<yournetworkid>'
Start the zerotier
/etc/init.d/zerotier enable
/etc/init.d/zerotier start
Go to my.zerotier.com, and authorize the device. Note the IP address assigned to this device (ex: 10.147.18.50).
In your route shell, run ifconfig, you can see a new interface with a name starting with ‘zt’ added and the IP from zerotier network assigned as shown on the ZT settings page.
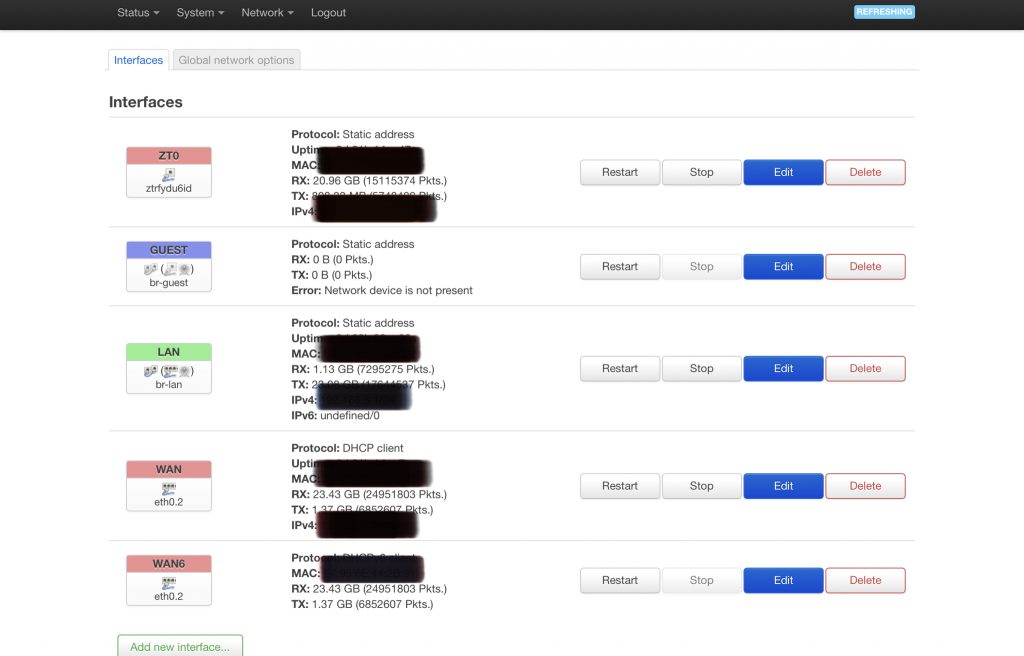
In your router Admin console, go to ‘More Settings‘->’Advanced‘, which will open Luci settings page.
Go to ‘Network’ -> ‘Add Interface’ with below details
| Name | ZT0 |
| Protocol | Static address |
| Interface | ztxxxxxxxx (Your ZT interface) |
Configure the ZT0 interface with the below values, Save and finally Save & Apply on the interfaces screen.
| Bring up on boot | Yes |
| IPv4 address | 10.147.18.50 (IP assigned to this device from ZT network) |
| IPv4 netmask | Netmask of your ZT IP range |
| Firewall Settings-> Create/Assign firewall-zone | wan,wan6,ZT0 |
After the router rebooted, ssh again to the router.
Run ifconfig and verify if you can see ZT network interface with the same IP.
Verify your routing table by running route -n
Run the below with your network id to allow default route via ZeroTier network.
sudo zerotier-cli set <networkId> allowDefault=1
The above should add few new routes to your route table, run route -n and verify.
Kernel IP routing table
Destination     Gateway         Genmask         Flags Metric Ref    Use Iface
0.0.0.0         10.147.18.21    128.0.0.0       UG    0      0        0 ztxxxxxxxx
0.0.0.0         192.168.1.1     0.0.0.0         UG    10     0        0 eth0.2
10.147.18.0     0.0.0.0         255.255.255.0   U     0      0        0 ztxxxxxxxx
128.0.0.0       10.147.18.21    128.0.0.0       UG    0      0        0 ztxxxxxxxx
192.168.1.0     0.0.0.0         255.255.255.0   U     10     0        0 eth0.2
192.168.2.0     0.0.0.0         255.255.255.0   U     0      0        0 br-lan
Test with Mobile Phone
- In a Mobile Phone, if you have ZeroTier One enabled in previous steps (Part-1), disable it.
- Connect to OpenWrt router through wifi
- Open browser and verify public ip using https://ifconfig.io
With this when your OpenWrt router is connected to the internet via ethernet cable outside of your home, the internet traffic from any lan/wifi clients connected to this router will be routed via your home securely.
Conclusion
We have configured the OpenWrt travel router to redirect all the via the ZeroTier gateway at home (like VPN client). This enables you to access the home network by multiple devices without installing ZeroTier one client on all those devices.
Optionally, you may install pi-hole to act as a DNS server for your virtual network and to block ads, you can configure this in raspberry pi, this may be for another post.
References
- https://github.com/zerotier/ZeroTierOne
- https://docs.gl-inet.com/en/3/setup/mini_router/first_time_setup/
Hi,
Your guide was very good and it all works perfectly apart from one part.
When I restart the router, I have to re-enter:
sudo zerotier-cli set allowDefault=1
As it doesn’t survive a reboot. Could you explain how to make this persistant across reboots please?
Hi Robert,
I have also observed the issue, but couldn’t spend time on it.
However, you may want to consider the init scripts and see if this can help.
https://openwrt.org/docs/techref/initscripts
Regards,
Hari
To execute the command “sudo zerotier-cli set allowDefault=1” in the OpenWrt shell and enable it to autostart, you can follow these steps:
Step 1: Create a startup script in the `/etc/init.d/` directory.
1. Connect to your OpenWrt device using SSH or another method.
2. Run the following command to create a new script file (replace `my_zerotier` with your desired script name):
“`shell
vi /etc/init.d/my_zerotier
“`
3. Press `i` to enter insert mode in the vi editor.
Step 2: Add the script content.
4. Enter the following script content into the editor:
“`shell
#!/bin/sh /etc/rc.common
START=99
start() {
echo “Enabling ZeroTier…”
/usr/sbin/zerotier-cli set 12345678 allowDefault=1
}
stop() {
echo “Stopping ZeroTier…”
# Add any stop logic if needed
}
reload() {
stop
start
}
restart() {
reload
}
boot() {
start
}
shutdown() {
stop
}
“`
5. Press the `Esc` key to exit insert mode.
6. Type `:wq` to save the file and exit the vi editor.
Step 3: Make the script executable.
7. Run the following command to make the script executable:
“`shell
chmod +x /etc/init.d/my_zerotier
“`
Step 4: Enable autostart.
8. Run the following command to enable the script to start at boot:
“`shell
/etc/init.d/my_zerotier enable
“`
Step 5: Start the service.
9. Finally, start the ZeroTier service by executing the following command:
“`shell
/etc/init.d/my_zerotier start
“`
That’s it! The ZeroTier service should now start automatically at boot, and you can manually start it using the `/etc/init.d/my_zerotier start` command.
Hi Robert
Did you manage to resolve your problem? If so, how?
Thanks
Hi Robert
Did you resolve the problem? If so, how did you do it?
Having trouble configuring managed routes. Can you please explain to me which IP is which?
I have followed https://www.reddit.com/r/zerotier/comments/et626u/guide_zerotier_install_on_glinet_router_openwrt/ to route internet traffic through zerotier.
great guide and indeed: same issues on persistent zerotier-cli set allowDefault=1 being retained.
Tried John’s approach, syntax error with usr\sbin\ – this resolved once removed, but again doesnt persist post reboot.
Put it in local.rc – doesnt work, put the line in zerotier config file, ditto.
Seems no matter where that line goes it needs to be added manually on each reboot which is a real pity. Anyone had any success getting it to retain in config post reboot please?
ok update: I can confirm John Chan’s post works – with 1 very small modification (as I got an error on “q” part).
I did opkg update, then opkg install nano and used nano instead of vi to edit. rest worked, rebooted and route -n showed the tables now were in persist state – hurrah!!
next project is to use a windows 10 stick running WSL2 Debian distro as an all in one ingress to my internet instead of Ubuntu PiZero2 device.
I went through all your steps after a reboot my travel router. I’m always getting this error:
curl: (7) Failed to connect to ifconfig.me port 80 after 3083 ms: Host is unreachable