
WARNING!!!
Before proceeding further, please note that It is dangerous to play with AC Power, do take enough safety precautions while building and testing. Please take the certified electrician’s help while installing it to the mains.
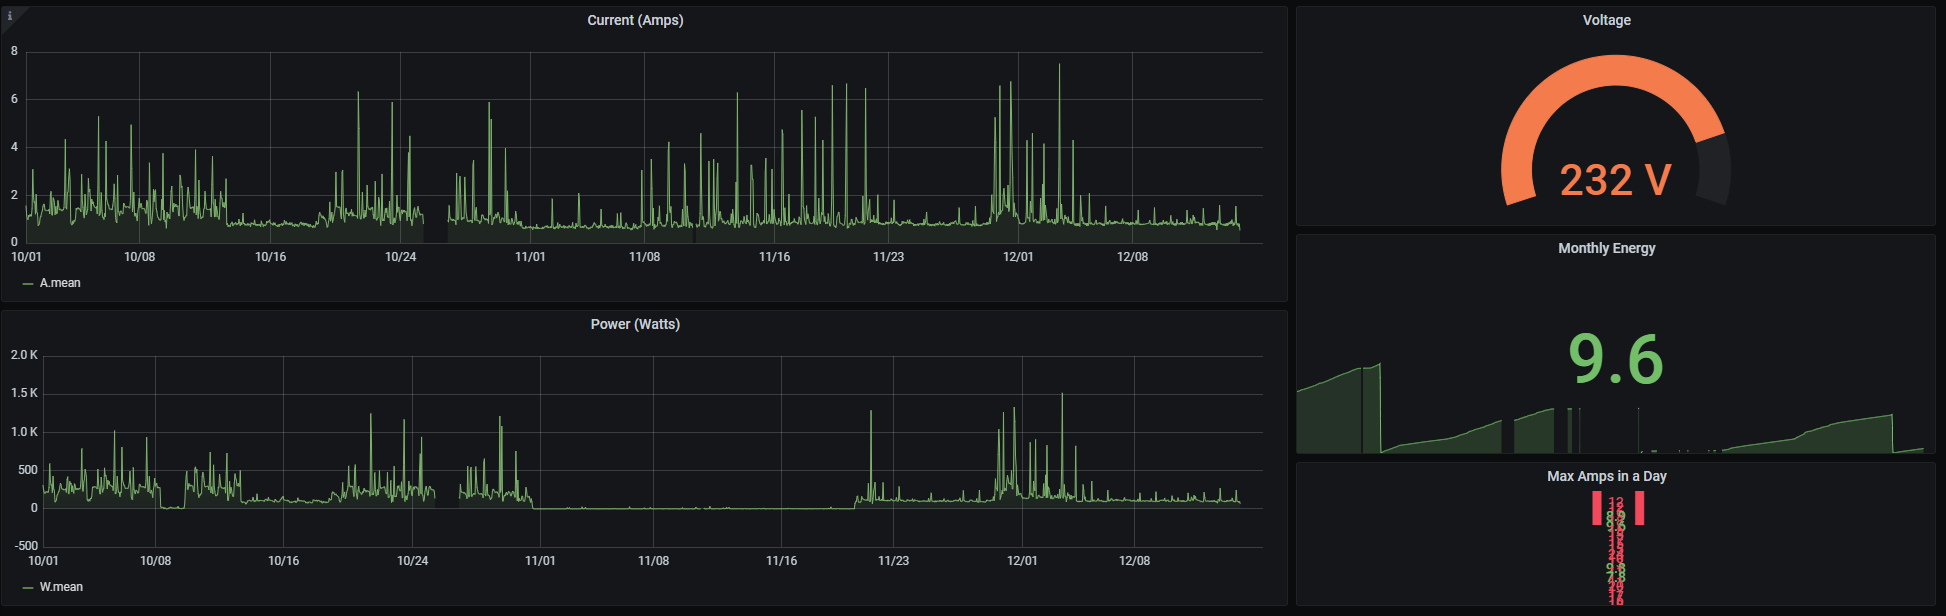
I wanted to monitor my home electricity usage and observe any unexpected spikes. I have built this couple of years ago in Covid-19 lockdown time in India at my home. Never got a chance to document my experience on this. So, here I am after close to 2 years 🙂
Please note, The below procedure may not be accurate at this moment, but i will try to correct if there are any gaps later and update this post. Feel free to ask me any questions you have in comments and will try to recall and answer.
On a high level, to start with i wanted to monitor whole house usage from mains, which should ideally be equivalent to the power meter reading by utility company. So, i took components to support that power usage.
Example, the current rating on the CT sesor is 100A, whereas if you just want to monitor one single room or appliance, you can take the sensor with ~30Amps.
Lets get started..
The main components used in this project are (provided links here from my orders – not referral links 🙂 )
- ESP-32 (ESP-WROOM-32) board
- SCT-013-000 Current Sensor 100A
- AC Voltage sensor board (ZMPT101B)
- OLED Module (0.96inch, 4Pin 128×64)
Calibrate sensors
The first step is to calibrate your sensors, sample code below. The EmonLib used here is a customized to work with ESP-32. It is available in my git repo part of the source.
The “EmonLib” is by openenergymonitor. Below the “EmonLib-esp32” is a custom library. My code base is mostly based out of Savjee. I have enhanced it for my purpose like OTA, Voltage sensor etc.., Thanks to him! Will provide other materials in references.
#include "EmonLib-esp32/EmonLib.h"             // Include Emon Library

#define VOL_ADC_INPUT 34
#define CUR_ADC_INPUT 35
#define emonTxV3 1

EnergyMonitor emon1;             // Create an instance

void setup()
{
  Serial.begin(115200);

  // Setup the ADC https://github.com/espressif/arduino-esp32
  adc1_config_channel_atten(ADC1_CHANNEL_6, ADC_ATTEN_DB_11); //pin 34
  adc1_config_channel_atten(ADC1_CHANNEL_7, ADC_ATTEN_DB_11); //pin 34
  analogReadResolution(ADC_BITS);
  pinMode(ADC_INPUT, INPUT);

  emon1.voltage(VOL_ADC_INPUT, 234.26, 1.7);  // Voltage: input pin, calibration, phase_shift
  emon1.current(CUR_ADC_INPUT, 60.6);       // Current: input pin, calibration.
}

void loop()
{
  emon1.calcVI(20,2000);         // Calculate all. No.of wavelengths, time-out
  emon1.serialprint();           // Print out all variables
}
For Calibration, you should have clamp meter to compare your readings. If you are new to the CT Sensor or Voltage sensor, please go through the links below to understand more about them before you proceed.
I would encourage you to read the Calibration theory from OpenEnergy Monitor documentation.
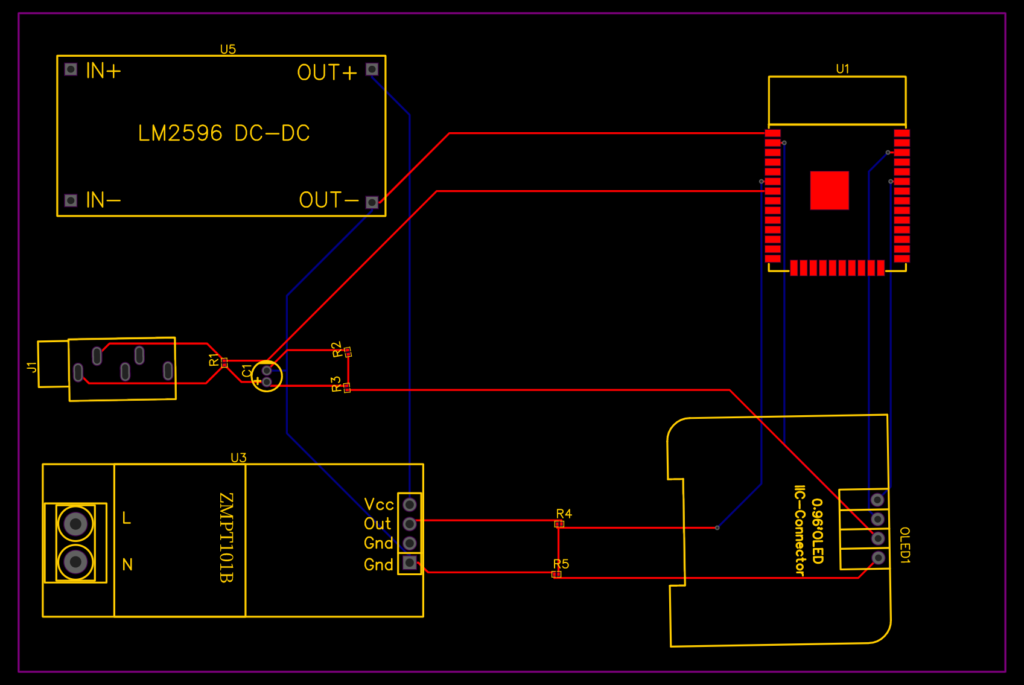
BOM
The BOM for this whole project is –
| SNo. | Name | Designator | Quantity |
| 1 | ZMPT101B | U3 | 1 |
| 2 | 22ohm | R1 | 1 |
| 3 | 15k | R2,R3 | 2 |
| 4 | 1k8 | R4 | 1 |
| 5 | 3k3 | R5 | 1 |
| 6 | ESP32-WROOM-32(16MB) | U1 | 1 |
| 7 | PJ-325M/3.5MM | J1 | 1 |
| 8 | 10uF | C1 | 1 |
| 9 | 0.96OLED_4P | OLED1 | 1 |
| 10 | DC-DC Buck LM2596 | U5 | 1 |
Apart from the above, i have used voltage divider circuit to supply voltage for both ESP and OLED from the same source. So, you can choose them based on your requirement.
Schematic & PCB Layout
The PCB Layout diagram (developed using easyEDA), Refer to the schematic here
Source Code
Clone the source from my repo. Modify the calibration information in home-energy-monitor.ino file and wifi and other config information in config/config.h.
This code base is using FreeRTOS for better utilising the ESP-32 dual cores.
Know-how
To upload the code to ESP-32, you may have to use FTDI programmer, and know your ESP voltage requirement before connecting.
You need to findout the correct sequence of steps to follow to put your ESP into flashing mode.
For the board i used, When Arduino IDE showing compiling, Press EN + Boot and Release EN When showing ‘Connecting…’, once it starts flashing you may release ‘Boot’ as well.
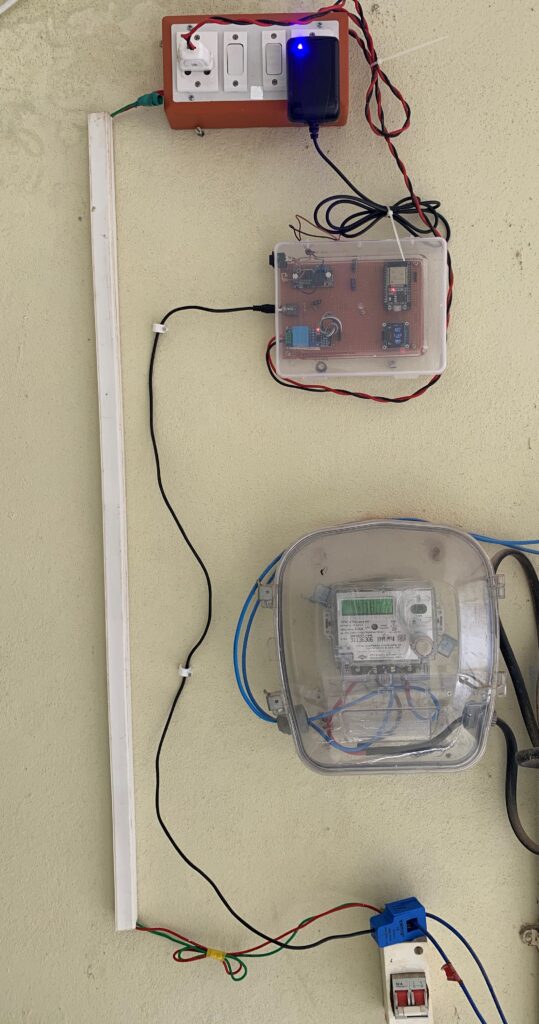
My current setup looks like this, even after 2 years it is sending the readings (though i need to re-calibrate for improved accuracy, its todo when i go back to india)
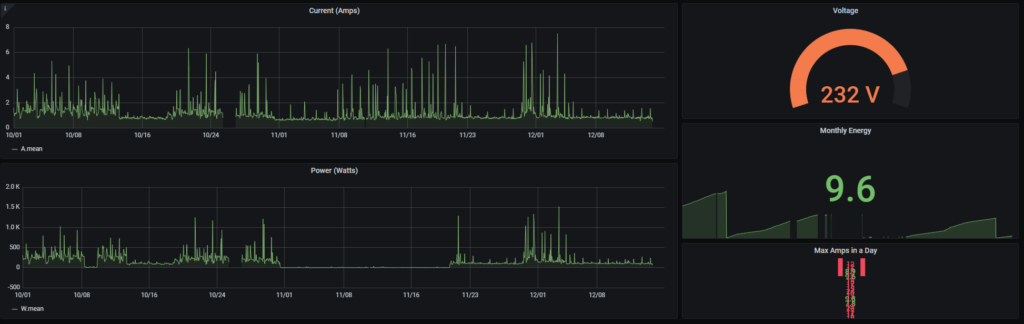
I wanted to provide highlights and relevant links in one post. Hope this is useful.
References
- https://learn.openenergymonitor.org/electricity-monitoring/ac-power-theory/introduction
- https://learn.openenergymonitor.org/electricity-monitoring/ac-power-theory/arduino-maths
- https://learn.openenergymonitor.org/electricity-monitoring/ctac/calibration
- https://learn.openenergymonitor.org/electricity-monitoring/ct-sensors/interface-with-arduino
- https://savjee.be/2020/01/multitasking-esp32-arduino-freertos/
- https://savjee.be/2020/02/home-energy-monitor-v2/
- https://www.espressif.com/sites/default/files/documentation/esp32-wroom-32_datasheet_en.pdf
the energy usage graph of your project is SPECTACULAR , i have been using ubidot MQTT and looking for a replacement, please mention which iot solution you are using .is it self hosted or paid service.
Hi.
Everything’s work almost perfect, except the Current and PowerFactor values, are reversed somewhere, so the Apparent Power is wrong.
Somewhere the Voltage is multiplied with PowerFactor and not Current.
Can you check please, cause I can’t find the issue?
Thanks!