

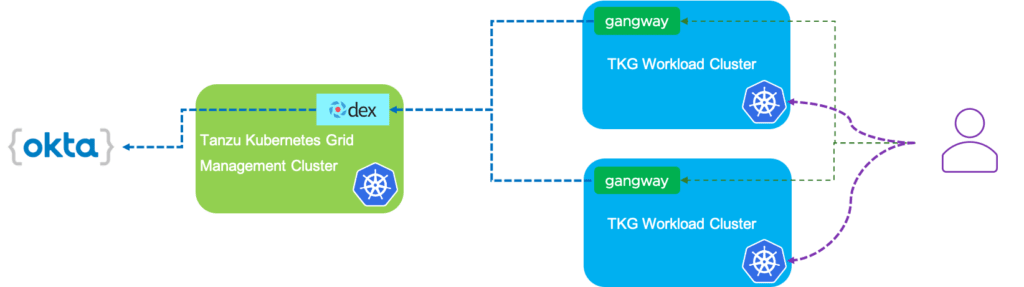
VMware TanzuTM Kubernetes GridTM (TKG) provides user authentication by using Dex and Gangway. Dex is an OpenID Connect (OIDC) provider, that enables authentication for Kubernetes clusters by connecting to external Identity Providers like Okta (OIDC). Gangway is a web application that enables the OIDC authentication flow, it is configured as a client of an upstream Identity Service that speaks OIDC. TKG running on Amazon EC2 supports only OIDC, so we are going to use Okta as the Identity provider and enable User Authentication on TKG clusters running on AWS EC2.
Before you begin
- I am using Mac to run the below commands, you may need to change some if you are using Windows especially.
- We are using TKG v1.1
- tkg cli v1.1 downloaded and configured
- You have TKG management cluster up and running on EC2 and have access to its config.
- Setup a developer account on Okta.
- I am using Okta, but you may use any supported OIDC providers, however, the configurations on the OIDC provider may vary.
- Have your Okta developer account url. Ex:
https://dev-000000.okta.com
Let’s dive in…
The shared services on TKG are provided as TKG Extensions Bundle.
Download the TKG Extensions Bundle by following the steps described in official documentation.
Unpack into the same directory where you are running tkg / kubectl commands. In my case i have unpacked under ~/workspace/tkg1.1
tar -xzf tkg-extensions-manifests-v1.1.0-vmware.1.tar.gz
Observe the tkg-extensions are unpacked under ~/workspace/tkg1.1. I will be executing all my commands relative to this path.

Enabling User Authentication for TKG Clusters involves multiple steps
- Deploying Dex on your Management Cluster running on EC2
- Create OIDC enabled TKG Workload Cluster
- Enable Gangway on OIDC enabled TKG Workload Cluster.
- Configure Workload Cluster as Client in Dex
- Access the cluster with Okta credentials.
Step 1: Deploying Dex on your Management Cluster on EC2
In this step we are going to deploy Dex to work with Okta as OpenID Provider. And once it is configured, dex will act as an Authentication provider for our TKG Workload Clusters.
Set your kubectl context to point to TKG management cluster.
Ex: kubectl config use-context tkg-mgmt-003a-admin@tkg-mgmt-003a
1. Create namespace
Create a namespace called tanzu-system-auth in your management cluster
kubectl apply -f tkg-extensions-v1.1.0/authentication/dex/aws/oidc/01-namespace.yaml
2. Create a Service for Dex
Create the Dex Service, this will create a LoadBalancer type service
kubectl apply -f tkg-extensions-v1.1.0/authentication/dex/aws/oidc/02-service.yaml
Get the hostname of the load balancer of the Dex Service
kubectl get svc dexsvc -n tanzu-system-auth -o jsonpath='{.status.loadBalancer.ingress[0].hostname}'Example LB hostname: a552c796e0846c2b83792e64ba1be4-834747576.us-east-1.elb.amazonaws.com
I would like to use a more readable name than this so I am going to use my own DNS zone in AWS to add an alias for this lb hostname. Though this is not mandatory, I would recommend to do it.
Add a DNS entry in Route53
In Route53, go to your host zone, click on CreateRecord Set.
- Enter the name as
dex - Select Type
A - Select
Alias–Yes - Paste the LB hostname in
Alias Target, clickCreate
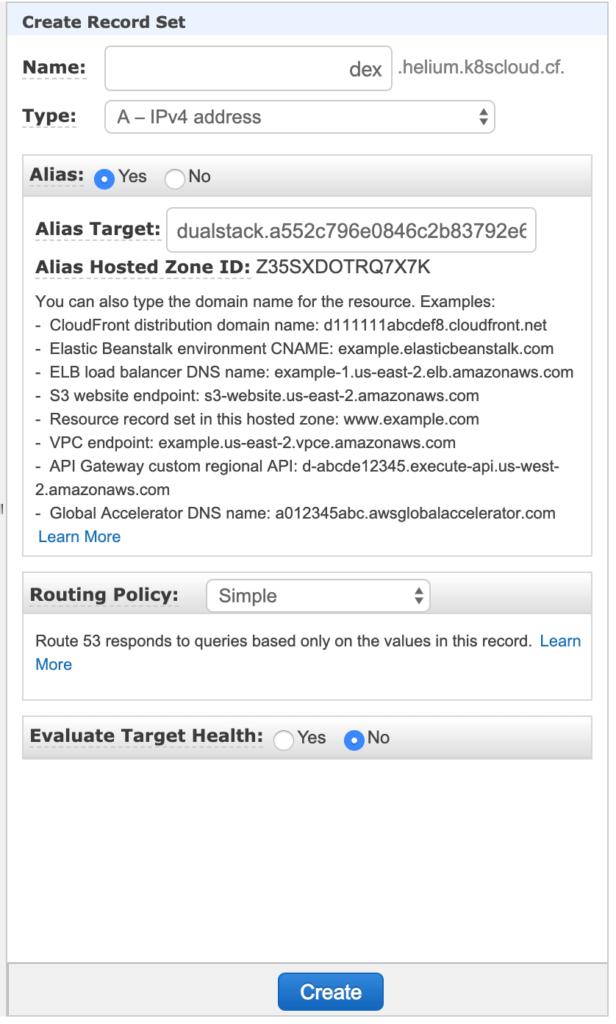
So, my dns name for dex service is dex.helium.k8scloud.cf
3. Create Self-Signed Certificate
Open tkg-extensions-v1.1.0/authentication/dex/aws/oidc/03-certs-selfsigned.yaml in text editor. Replace <DEX_SVC_LB_HOSTNAME> with the dex dns name.
Run the below command to create self-signed certificate.
kubectl apply -f tkg-extensions-v1.1.0/authentication/dex/aws/oidc/03-certs-selfsigned.yaml
4. Create Dex Configuration (ConfigMap)
Open the Dex Configuration Map file in the text editor. tkg-extensions-v1.1.0/authentication/dex/aws/oidc/04-cm.yaml.
- Replace
<DEX_SVC_LB_HOSTNAME>with dex dns name.- Ex:
dex.helium.k8scloud.cf
- Ex:
- Replace
<OIDC_IDP_URL>with okta developer account url.- Ex:
https://dev-000000.okta.com
- Ex:
Run the below command to create the configmap.
kubectl apply -f tkg-extensions-v1.1.0/authentication/dex/aws/oidc/04-cm.yaml
5. Create RBAC
Run the below command to Configure Role Based Access Control (RBAC).
This creates a Service Account, Cluster Role and Cluster Role Binding.
kubectl apply -f tkg-extensions-v1.1.0/authentication/dex/aws/oidc/05-rbac.yaml
Create an Application in Okta
As we are using Okta as our OIDC provider, we need to create an application in Okta to integrate with dex. Login to Okta developer account with your admin credentials
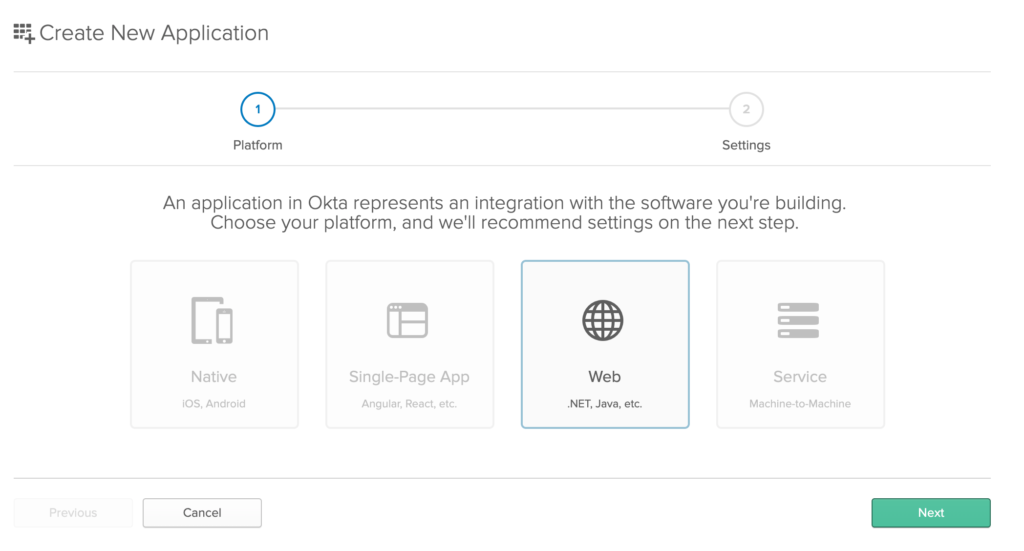
Goto Applications and click on Add Application.
On the next screen, select Web application icon and click on Next
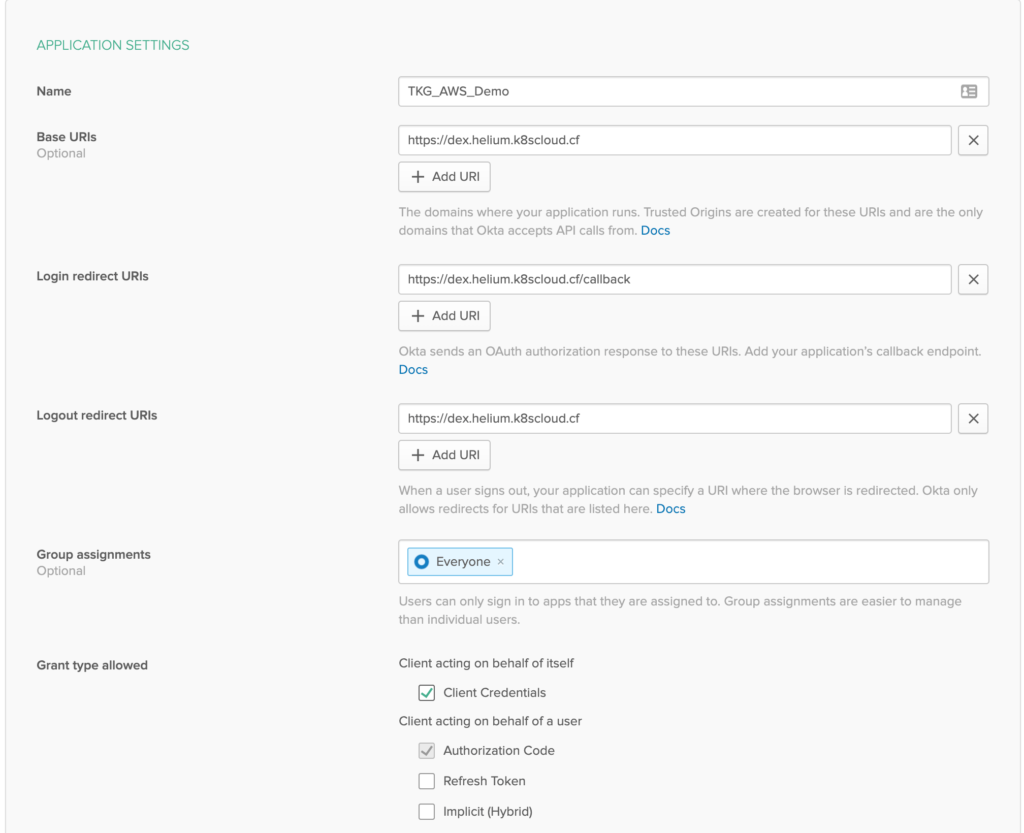
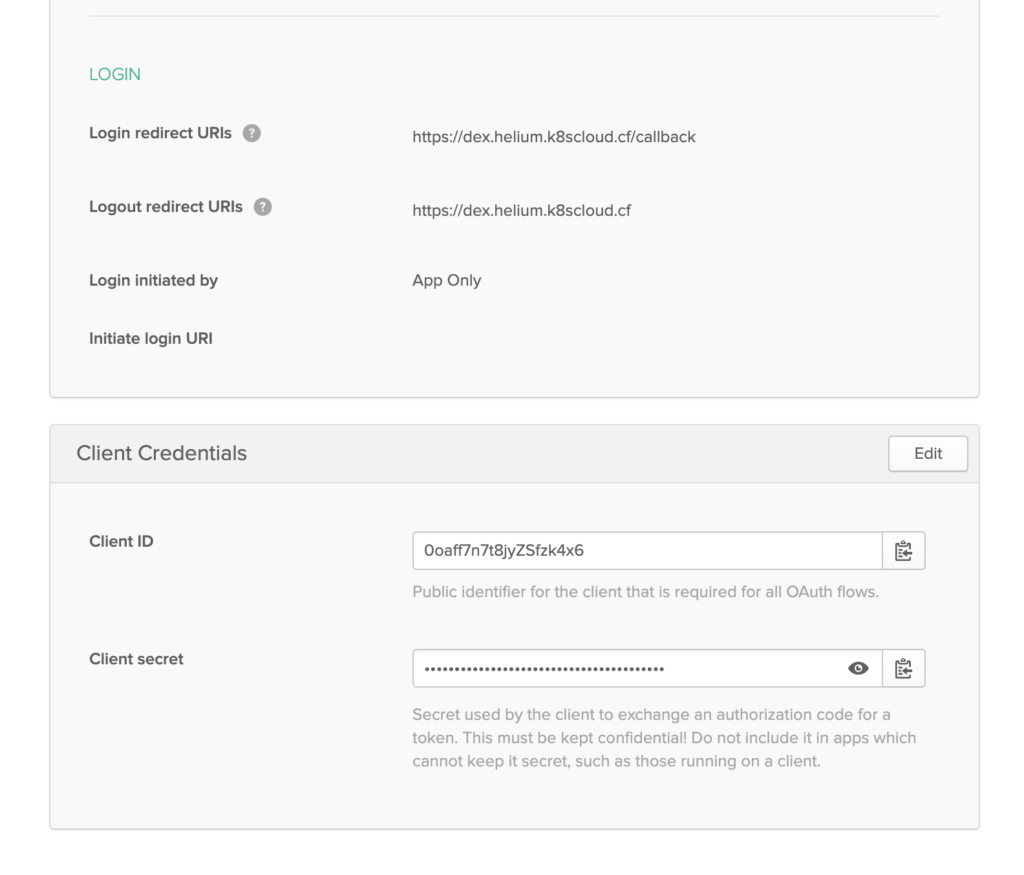
On the Settings screen, enter the below information and click ‘Done‘.
- Name of the application, ex:
TKG_EC2_Dex - Base URIs – Provide as your Dex URL, ex:
https://dex.helium.k8scloud.cf - Login redirect URIs – Provide the value from redirectURI of dex config map (see dex configmap) , ex:
https://dex.helium.k8scloud.cf/callback - Logout redirect URIs – Provide as your Dex URL, ex:
https://dex.helium.k8scloud.cf - Grant type allowed, select
Client Credentials.
In the next screen, under Client Credentials, make note of Client ID and Client secret, which we will be using in next step.
6. Configure Secret
Back to dex configuration. A sample secret file has been provided in the bundle, run the below command to copy to 06-0-secret.yaml.
cp tkg-extensions-v1.1.0/authentication/dex/aws/oidc/06-0-secret.example tkg-extensions-v1.1.0/authentication/dex/aws/oidc/06-0-secret.yaml
Open the secret yaml file in text editor tkg-extensions-v1.1.0/authentication/dex/aws/oidc/06-0-secret.yaml
Run below command by replacing <OKTA_CLIENT_ID> with Client ID obtained in the above step
echo -n "<OKTA_Client_ID>" | base64
Replace the <CLIENT_ID> in secret yaml with the output of the above command
Run the below command by replacing <OKTA_CLIENT_SECRET> with Client secret obtained in the above step.
echo -n "<OKTA_CLIENT_SECRET>" | base64
Replace the <CLIENT_SECRET> in secret yaml with the output of the above command
Save the file and Run the below command to create the secret
kubectl apply -f tkg-extensions-v1.1.0/authentication/dex/aws/oidc/06-0-secret.yaml
7. Create the Dex deployment
kubectl apply -f tkg-extensions-v1.1.0/authentication/dex/aws/oidc/06-deployment.yaml
Validate if the dex pods are running by using
kubectl get pods -n tanzu-system-auth
8. Export Dex CA Certificate
Export the Dex CA Certificate to file, this will be used in the Gangway configuration step (Step 3).
kubectl get secret dex-cert-tls -n tanzu-system-auth -o 'go-template={{ index .data "ca.crt" }}' | base64 -D > dex-ca.crtNote: If you are using Linux, replace base64 -D with base64 -d.
Step 2: Create OIDC enabled TKG Workload Cluster
In previous step, we have enabled Dex to provide Authentication service. Now we have to create the TKG Workload Clusters which uses Dex for cluster user Authentication.
1. Create new TKG Plan
In the TKG Extensions Bundle, we have a special plan which is using Dex as Authentication provider. Copy/Move the file cluster-template-oidc.yaml to the Cluster API provider for EC2. The tkg configuration directory is ~/.tkg in Linux or Mac.
mv tkg-extensions-v1.1.0/authentication/dex/aws/cluster-template-oidc.yaml ~/.tkg/providers/infrastructure-aws/v0.5.3/cluster-template-oidc.yaml
2. Export OIDC environment variables
Make sure that your kubectl context is set to the management cluster. Ex: kubectl config use-context tkg-mgmt-003a-admin@tkg-mgmt-003a
Set the below environment variables
Replace <DEX_SVC_LB_HOSTNAME> with dex dns name. Ex: export OIDC_ISSUER_URL=https://dex.helium.k8scloud.cf
export OIDC_ISSUER_URL=https://<DEX_SVC_LB_HOSTNAME>
export OIDC_USERNAME_CLAIM=email
export OIDC_GROUPS_CLAIM=groups
export DEX_CA=$(kubectl get secret dex-cert-tls -n tanzu-system-auth -o 'go-template={{ index .data "ca.crt" }}' | base64 -D | gzip | base64)
Note: If you are using Linux, replace the base64 -D with base64 -d in DEX_CA variable.
The above values will be passed as parameters to kube-apiserver while creating the cluster.
oidc-issuer-url: ${ OIDC_ISSUER_URL }
oidc-username-claim: ${ OIDC_USERNAME_CLAIM }
oidc-groups-claim: ${ OIDC_GROUPS_CLAIM }
oidc-ca-file: /etc/tkg/pki/dex-ca.crt
3. Create TKG Workload Cluster
Set your tkg cli context to your management cluster. Ex: tkg set management-cluster tkg-mgmt-003a
tkg set management-cluster <management-cluster>
Create the TKG workload Cluster using the new plan provided (oidc). I have used demo-oidc-cluster as the name for my new cluster.
tkg create cluster demo-oidc-cluster --plan=oidc
This will take some time and create the cluster. Once cluster is created, get the cluster credentials
tkg get credentials demo-oidc-cluster
Set the kubectl context to our new workload cluster
kubectl config use-context demo-oidc-cluster-admin@demo-oidc-cluster
Step 3: Enable Gangway on OIDC enabled TKG Workload Cluster
This step will enable Gangway on our workload cluster.
Make sure your kubectl context is set to workload cluster.
1. Install the cert-manager to workload cluster
kubectl apply -f tkg-extensions-v1.1.0/cert-manager/
2. Create a namespace
Create namespace in workload cluster with name tanzu-system-auth
kubectl apply -f tkg-extensions-v1.1.0/authentication/gangway/vsphere/01-namespace.yaml
3. Create the Gangway Service
Run the below command to create Gangway Service of type LoadBalancer.
kubectl apply -f tkg-extensions-v1.1.0/authentication/gangway/aws/02-service.yaml
Get the host name of the Gangway service load balancer
kubectl get svc gangwaysvc -n tanzu-system-auth -o jsonpath='{.status.loadBalancer.ingress[0].hostname}'Add a DNS entry in Route53 for this url. Ex: gangway.helium.k8scloud.cf. Refer to Add DNS entry in Route53 section above.
4. Create Gangway Configuration (ConfigMap)
Open the gangway configmap file in any text editor tkg-extensions-v1.1.0/authentication/gangway/aws/03-config.yaml. Modify the below
- Replace all instances of
<WORLOAD_CLUSTER_NAME>with our cluster name. Ex:demo-oidc-cluster - Replace
<DEX_SVC_LB_HOSTNAME>with the dex dns name. Ex:dex.helium.k8scloud.cf - Replace
<GANGWAY_SVC_LB_HOSTNAME>with gangway dns name we created in above step. - Replace
<APISERVER_URL>with our workload Kubernetes Cluster endpoint. This is AWS load balancer name with name like ‘demo-oidc-cluster-*.elb.amazonaws.com’. You can get it easily by runningkubectl config viewand take just the hostname part from server property of our workload cluster.

Create ConfigMap
kubectl apply -f tkg-extensions-v1.1.0/authentication/gangway/aws/03-config.yaml
5. Create Secret
A sample secret file is provided in bundle, copy the file to create a secret yaml 04-secret.yaml.
cp tkg-extensions-v1.1.0/authentication/gangway/aws/04-secret.example tkg-extensions-v1.1.0/authentication/gangway/aws/04-secret.yaml
Open the tkg-extensions-v1.1.0/authentication/gangway/aws/04-secret.yaml in text editor
Run the below commands at command line to create session key & client secrets using openssl.
Note: In the below command pbcopy copies the output of the command to clipboard.
openssl rand -base64 32 | pbcopy
In secret file in editor (04-secret.yaml), update the sesssionKey value by pasting.
Run the following commands to create client secret.
Note: Please run as given below, we are going to use clientSecret variable value generated in this step later in the procedure.
clientSecret=$(openssl rand -base64 32)
echo -n "$clientSecret" | base64
In the secret file in editor(04-secret.yaml), update the clientSecret property value with the output of above echo command.
Apply the secret to file to cluster
kubectl apply -f tkg-extensions-v1.1.0/authentication/gangway/aws/04-secret.yaml
6. Create Self-Signed Certificate for Gangway Service
Open the file tkg-extensions-v1.1.0/authentication/gangway/aws/05-cert-selfsigned.yaml in text editor.
- Replace the
<GANGWAY_SVC_LB_HOSTNAME>with the gangway dns name. Ex:gangway.helium.k8scloud.cf
Create the self-signed certificate
kubectl apply -f tkg-extensions-v1.1.0/authentication/gangway/aws/05-cert-selfsigned.yaml
7. Create ConfigMap with Dex CA Cert
Create the ConfigMap with the Dex CA Certificate which we created in Step 1. Ensure the file dex-ca.crt exist in your working directory.
kubectl create cm dex-ca -n tanzu-system-auth --from-file=dex-ca.crt=dex-ca.crt
8. Create the gangway deployment
kubectl apply -f tkg-extensions-v1.1.0/authentication/gangway/aws/06-deployment.yaml
Ensure gangway is up & running
kubectl get pods -n tanzu-system-auth
Step 4: Configure Workload Cluster as Client in Dex
In this section, we are going to configure Dex with the new workload cluster as a Client. For this we have to modify the Dex ConfigMap we created earlier. We are going to update the same yaml file we used to create Dex ConfigMap and modify the contents and re-apply changes to Management Cluster.
1. Modify Dex Configuration File
Open the Dex ConfigMap yaml file in any text editor tkg-extensions-v1.1.0/authentication/dex/aws/oidc/04-cm.yaml
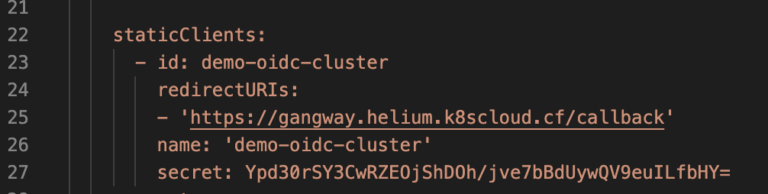
You will see the staticClients property as shown in the above picture. This is an array element, modify this as below
 staticClients:
 - id: <WORKLOAD_CLUSTER_NAME>
   redirectURIs:
   - 'https://<GANGWAY_SVC_LB_HOSTNAME>/callback'
   name: '<WORKLOAD_CLUSTER_NAME>'
   secret: <clientSecret>
- Replace
<WORKLOAD_CLUSTER_NAME>with our workload cluster name. Ex:demo-oidc-cluster - Replace
<GANGWAY_SVC_LB_HOSTNAME>with gangway dns name. Ex:gangway.helium.k8scloud.cf - Replace
<clientSecret>with the output of the below command. (This variable we generated in Step 3 ).echo $clientSecret
The Modified content may look like this
2. Apply changes to Dex ConfigMap
Set the kubectl context to your management cluster. Ex: kubectl config use-context tkg-mgmt-003a-admin@tkg-mgmt-003a
kubectl config use-context <mgmt-cluster-context>
Apply the modified configuration to Management Cluster.
kubectl apply -f tkg-extensions-v1.1.0/authentication/dex/aws/oidc/04-cm.yaml
3. Delete Running Dex Pod
To reflect the changes we made to ConfigMap, delete the currently running Dex pod, so the dex deployment will start a new pod and which picks up new changes in configmap.
kubectl get pods --namespace tanzu-system-auth
The pods list may look like this, copy the pod name

Run the below command with the dex pod name (Replace it with your pod name).
kubectl delete pod dex-565599c4b6-w99wn -n tanzu-system-auth
Ensure a new pod came up
kubectl get pods -n tanzu-system-auth
With this step, we have configured Dex in management cluster, gangway in workload cluster and informed Dex about the client in our workload cluster.
Step 5: Access the cluster with Okta credentials
In this step we are going to validate our Dex, Gangway integration. We are going to use gangway url to access the cluster login page and use our developer okta credentials to login to get kubeconfig to access our workload cluster with our okta user.
1. Get the Kube config
Open the browser and access the gangway url. Ex: https://gangway.helium.k8scloud.cf
You might have to accept the browser warning as we are using self-signed certs.

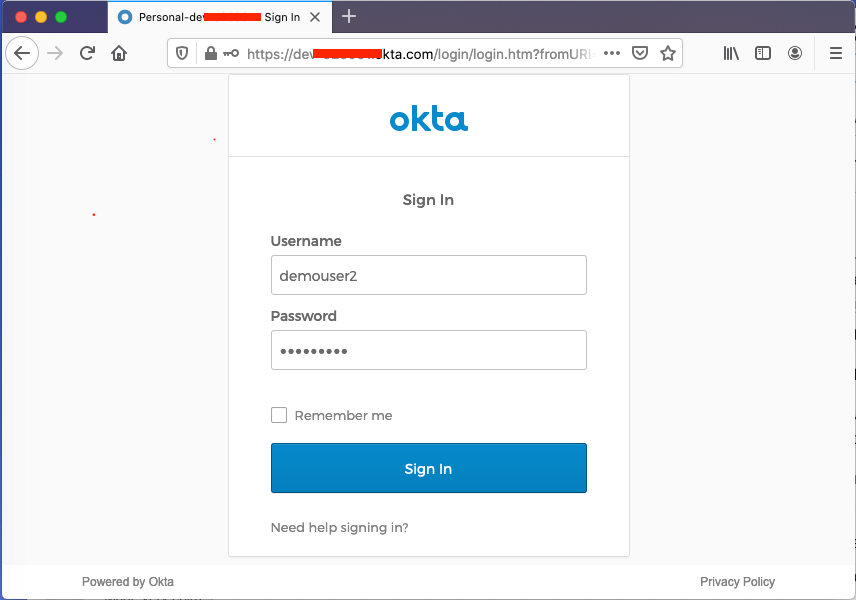
Click on SIGN IN, this will redirect url to dex, then to okta login page. Use your okta credentials to login.
Note: I made some modifications to my okta profile to allow username as not email. But for you it may be email to start with.
Once the login and token generation is successful, you will see below screen.
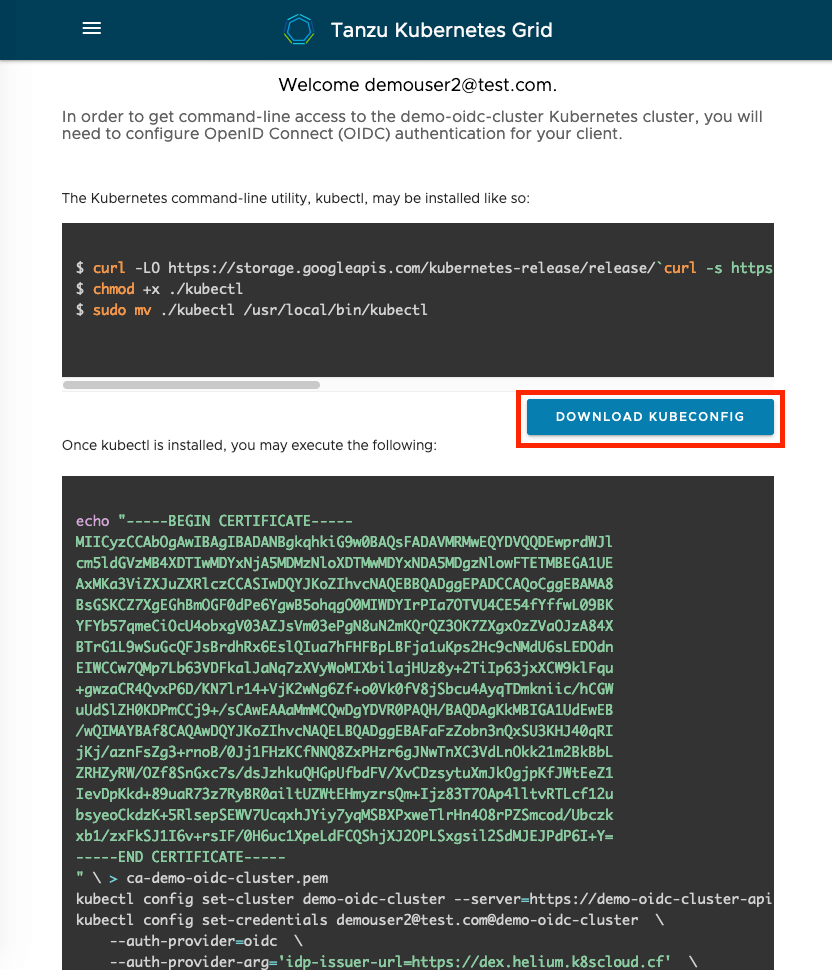
Click on DOWNLOAD KUBECONFIG to download the kubeconf for the cluster.
2. Verify access to Cluster
As we are already using the current terminal window to access our workload cluster using admin credentials, we are going to validate the new credentials using another terminal.
Copy the downloaded kubeconf file to working directory.
Open a new terminal, and navigate to your workind directory, set KUBECONFIG=kubeconf. Run the below command to get the list of pods in the default namespace
kubectl get pods
You may get access error like below because the user doesn’t have permission to perform any actions like create, update, reconfigure, delete etc..

3. Provider Cluster permission to Okta user
The appropriate cluster roles and cluster role bindings must be defined. Refer to Kubernetes documentation for Using RBAC Authorization. In the below example I am using the default role cluster-admin, which gives full access to cluster.
Create the file cluster-user-rbac.yaml with the below content by changing the username to your Okta username.
kind: ClusterRoleBinding
apiVersion: rbac.authorization.k8s.io/v1
metadata:
  name: okta-user-access-binding
subjects:
  - kind: User
    name: [email protected]
    apiGroup: rbac.authorization.k8s.io
roleRef:
  kind: ClusterRole
  name: cluster-admin
  apiGroup: rbac.authorization.k8s.io
Go to your original terminal where the context is set to your workload cluster with admin user. Run the below to apply Cluster Role Binding
kubectl apply -f cluster-user-rbac.yaml
Now, run the below command to test the access
kubectl get pods -A
With this now you can access to workload cluster using the OIDC Authentication.
Summary
With this integration of Dex and Gangway to our TKG management and workload clusters, we are able to access our workload cluster with okta credentials and we can enable access to all required users in the organization. However, with the configurations we have used in this post it will only allow us to provide permissions to individual users, in the next post I will cover the steps to enable groups access.
Additional Info
With the default configuration of Dex above, the id token will expire in 5m, if you would like to increase the token expiry, modify the below
Open the tkg-extensions-v1.1.0/authentication/dex/aws/oidc/04-cm.yaml in text editor.
Change the idTokens value to desired duration, ex: 24h
expiry:
      signingKeys: "10m"
      idTokens: "5m"
Apply the changes to management cluster
kubectl apply -f tkg-extensions-v1.1.0/authentication/dex/aws/oidc/04-cm.yaml
Delete the running dex pod
kubectl get pods --namespace tanzu-system-auth
kubectl delete pod <dex pod name> -n tanzu-system-auth
References
- VMware Tanzu Kubernetes Grid Official documentation
- https://github.com/dexidp/dex
- https://github.com/heptiolabs/gangway
- https://developer.okta.com/docs/reference/api/oidc/